Wednesday, February 22, 2012

Alice in Wonderland Mini (free printables)

I've been a zombie for the last three weeks. Why? I've recently started using my scrapbook software I purchased over a year ago. Not very good yet, but someday I'll get there. Anyway, I am quite impressed with myself (yes bragging). I have done something I didn't think I would ever do.  I just needed some inspiration from other digital scrapbookers. I think that's what you call them- now me.

As I was saying, zombie. Every chance I had- I worked on an Alice in Wonderland digital Mini. I'm a very slow crafter and slightly anal about certain things. Perfect pictures, perfect colors, so on... Of course, you would never know that cause my crafts are NEVER perfect.  I also take forever to finish any project I start.

Because I am new at this. I don't have a lot of digital backgrounds or images that I can use. So, I googled pretty much everything. I am a Google FREAK.  I believe you can find anything by googling. And you all know, as searching and googling goes.  I tend to find many interesting things and often get sidetracked from what I was originally doing. So, there's a few more hours added to not finishing a project. Eventually, I did finish my first digital mini. And now I am going to share it. You may print it out and decorate it however you want. I will be back to show you the final product with added embellishments. I enjoyed doing this very much and can't wait to start on another one. Hope you like it.

I found tons of digital free stuff from these wonderful blogs. Visit them. They are super SWEET for sharing and creatively TALENTED in what they do.  All of the Alice in Wonderland pictures were from random websites.  Sorry, too many to list.  Like I said, I just googled everything.

* SweetlyScrapped
* Shabby Blogs
* Shery K Designs
* Starsflowerstudio
* A Cherry on Top
* Hub Pages
* Free Pretty Things For You


Cut around the full pages and fold it in half.  Put glue on the back around the edges.  Mini book size is about 8' X 5 2/8'.

As for the envelopes, cut it out.  Fold the two smaller edges to form kind of a pouch.  Put glue on those small folded edges only.

 
Pin It

Monday, February 13, 2012

Chocolate Covered Valentine Treat


Last minute treat for my students and friends.  Yes, another Pinterest inspiration.  I'm slowly planning-organizing for my baby girl's birthday in April.  So, I'm doing some treat testing.  Chocolate dipped pretzals.

Tuesday, February 7, 2012

Just Married Card

Just wanted to share a cute little picture of one of my co-worker's grandson Ryder.  He is too cute!  She wanted to print this out and make a wedding card out of it.  Great idea Theresa!


Right Click- save as, print, cut in half and fold - if you, too, would like to make this a wedding card.


Tutorial on Valentine's Day Treat


Just wanted to post what I've been working on.  Found this beautiful Valentine's Day scrap project on so many different talented ladies' blogs.  I had to make some myself.  They were very simple to make.  I'm making these for some of my teacher friends at school.   Here's a tutorial on how to make the specific one I made or you could click HERE and watch another tutorial.  Her video will show you how to fold the paper to form the shape of the box. 

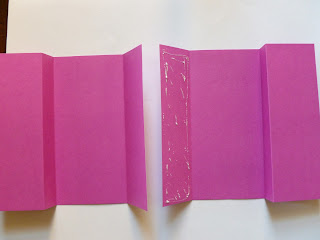
 Cut 2 papers at 5 1/2in.  X  6 1/2 in. Score it at 1 3/8in, 4in, and 4 5/8 in.  Fold in at 1 3/8'' and 4''.  At 4 5/8'' fold it going the opposite way.

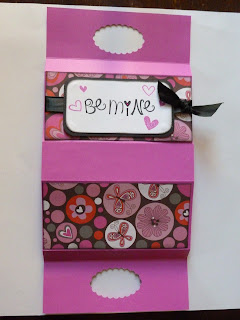
 Hold the two bigger ends together (paper facing eachother) and punch a handle with your puncher.


 Glue the two papers together to form a bottom.


 Cut pretty pattern (optional) rectangle to decorate the front.  Cut at 5 3/8" X 2 1/2 ".


Black paper - 4" X 2 1/8"
White paper for stamping - 3 7/8" X 2". 
I used my corner punch to round the corners.  Stamped some Valentine sayings and hearts. Glued dazzles as well. 


Cut ribbons and tie a bow on one side.  Then glue the rectangle on the outside of the box.


To make the inside band that holds the candy heart- cut 1 1/2" X 9 1/2".  Score it at 3/4", 2", 7 1/2", and 8 3/4".  Before folding, use an edge puncher and punch one side. 


Pattern paper measures at 5 1/2" X 1".  You don't have to have a pretty paper inside.  You could punch out hearts and glue them on the band or put stickers on it.  Before gluing down the band sides, use a ruler and put a pencil mark at about 1 3/4" from the middle section.  This is to insure that you glue your band evenly on both sides. 


Last step: Cut a big sized ribbon and tie the top closed
Voila! All done. 

I also made some smaller single heart treats.  You pretty much follow the same steps.  Except, there's only one paper.  Measurements are 10 1/4" X 2 3/4".  Score at  1 3/8", 1 7/8",  4 1/2", 5 3/4", 8 3/8", and 8 7/8".  Don't forget- when folding your paper, the two outermost scored lines fold out and the rest fold in to make a curve on the top of the treat box.  On the outside, I glued Valentine printables on the front and back.  You could find some free Valentine's Day printables HERE on Catch My Party website.  Or you could go and follow me on PINTEREST for more free printables.  I also stamped and punched out flowers on some. 


I found these wonderful heart shaped candy holder at $tree in the wedding isle.  4 for $1.00. Wahoo!


Hope you can understand my gibberish.  Try it! Very fun and beautiful!